Configure Change Detection
Prerequisites: You have already
- uploaded some data
- defined the Schema with some labels.
One of the most important features of Horreum is Change Detection - checking if the new results significantly differ from previous data.
Horreum uses Change Detection Variables to extract and calculate Datapoints - for each dataset and each variable it creates one datapoint.
Horreum compares recent datapoint(s) to older ones and if it spots a significant difference it emits a Change, and sends a notification to subscribed users or teams.
User can later confirm that there was a change (restarting the history from this point for the purpose of change detection) or dismiss it.
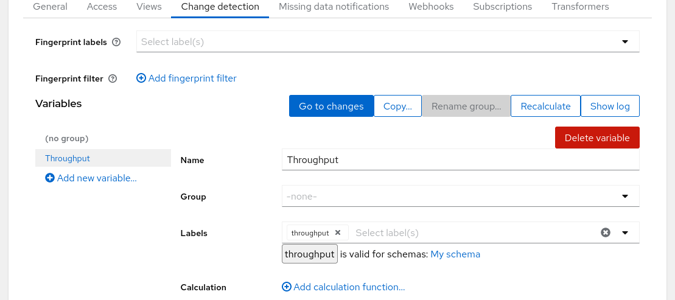
Let’s go to the test and switch to the ‘Change Detection’ tab:
User logged in
We have created one variable Throughput using the label throughput. You could use multiple labels and combine them using a Javascript function, similar to the way you’ve combined JSON Path results when defining the label. But in this case further calculation is not necessary.
One chart can display series of datapoints for multiple variables: you can use Groups to plot the variables together. The dashboard will contain one chart for each group and for each variable without a group set.
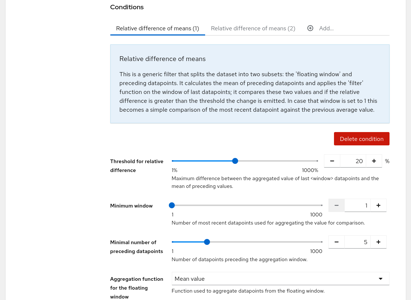
If you scroll down to the ‘Conditions’ section you’ll find the criteria used to detect changes. By default there are two conditions: the first condition effectively compares last datapoint vs. mean of datapoints since last change, the second condition compares a mean of short sliding window to the mean of preceding datapoints, with more strict thresholds. You can change or remove these or add another criteria such as checking values vs. fixed thresholds.
The default conditions do not distinguish changes causing increase or decrease in given metric. Even if the effect is positive (e.g. decrease in latency or increase in throughput) users should know about this - the improvement could be triggered by a functional bug as well.
User logged in
In the upper part of this screen you see a selection of Fingerprint labels and filter; in some cases you might use the same Test for runs with different configuration, have multiple configurations or test-cases within one run (and produce multiple Datasets out of one Run) or otherwise cause that the Datasets are not directly comparable, forming several independent series of datasets. To identify those series you should define one or more labels, e.g. label arch being either x86 or arm and label cpus with the number of CPUs used in the test. Each combination of values will form an unique ‘fingerprint’ of the Dataset, had we used 3 values for cpu there would be 6 possible combinations of those labels. When a new Dataset is added only those older Datasets with the same fingerprint will be used to check against. The filter can be used to limit what datasets are suitable for Change Detection at all - you could also add a label for debug vs. production builds and ignore debug builds.
When we hit the save button Horreum asks if it should recalculate datapoints from all existing runs as we have changed the regression variables definition. Let’s check the debug logs option and proceed with the recalculation.

User logged in
When the recalculation finishes we can click on the ‘Show log’ button in upper right corner to see what was actually executed - this is convenient when you’re debugging a more complicated calculation function. If there’s something wrong with the labels you can click on the Dataset (1/1 in this case) and display label values and calculation log using the buttons above the JSON document.

User logged in
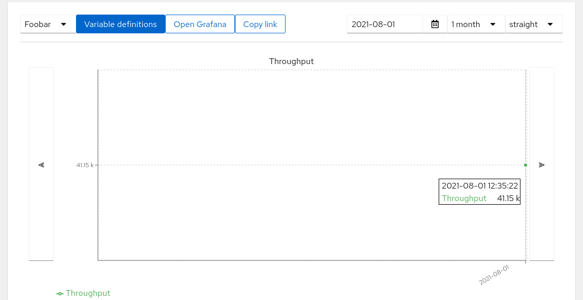
If everything works as planned you can close the log and click the ‘Go to series’ button or use the ‘Changes’ link in navigation bar on the top and select the test in the dropbox. If the uploaded data has a timestamp older than 1 month you won’t see it by default; press the Find last datapoints button to scroll back. You will be presented with a chart with single dot with result data (we have created only one Run/Dataset so far so there’s only one datapoint).
User logged in
In order to receive notifications users need to subscribe to given test. Test owner can manage all subscriptions in the ‘Subscriptions’ tab in the test. Lookup the current user using the search bar, select him in the left pane and use the arrow to move him to the right pane.

Subscriptions
You can do the same with teams using the lists in the bottom. All available teams are listed in the left pane (no need for search). When certain users are members of a subscribed team but don’t want to receive notifications they can opt out in the middle pair of lists.
When you save the test and navigate to ‘Tests’, you can notice a bold eye icon on the very left of the row. This signifies that you are subscribed. You can click it and manage your own subscriptions here as well.

Watching
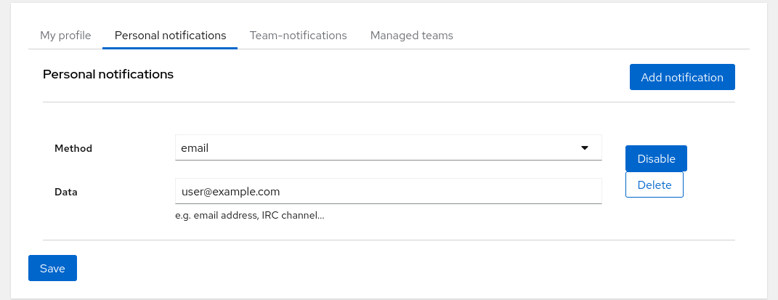
Despite being subscribed to some tests Horreum does not yet know how should it notify you. Click on your name with user icon next to the ‘Logout’ button in the top right corner and add a personal notification. Currently only the email notification is implemented; use your email as the data field. You can also switch to ‘Team notifications’ tab and set a notification for an entire team. After saving Horreum is ready to let you know when a Change is detected.
Notifications
Developers often run performance tests nightly or weekly on a CI server. After setting up the workflow and verifying that it works you might be content that you have no notifications in your mailbox, but in fact the test might get broken and the data is not uploaded at all. That’s why Horreum implements watchdogs for periodically uploaded test runs.
Go to the ‘Missing data notifications’ tab in the test and click the ‘Add new rule…’ button. If you expect that the test will run nightly (or daily) set the ‘Max staleness’ to a value somewhat greater than 24 hours, e.g. 25 h. We don’t need to filter runs using the Labels and Condition so you might keep them empty - this will be useful e.g. if you have datasets with different fingerprints. The rules are periodically checked and if there is no dataset matching the filter with start timestamp in last 25 hours the subscribed users and teams will receive a notification.
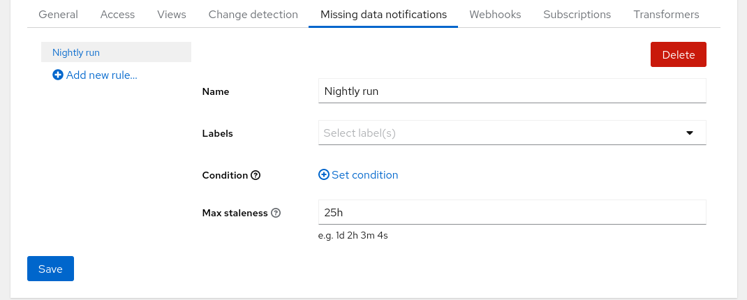
Missing Data
In the ‘General’ tab it is possible to switch off all notifications from this test without unsubscribing or changing rules. This is useful e.g. when you bulk upload historical results and don’t want to spam everyone’s mailbox.
You can continue exploring Horreum in the Actions guide.
Feedback
Was this page helpful?
Glad to hear it! Please tell us how we can improve.
Sorry to hear that. Please tell us how we can improve.